


Introduction
Microgreens are tiny, nutrient-packed plants that can be grown easily at home. Whether you’re a beginner or an experienced gardener, growing microgreens is a fun and rewarding way to enjoy fresh, healthy greens all year round. This guide will walk you through the entire process, from choosing the right seeds to harvesting your first batch.
Understanding Microgreens
What Are Microgreens?
Microgreens are young plants that are harvested just after their first true leaves appear. They are smaller than baby greens but larger than sprouts. These colorful seedlings are packed with vitamins and minerals, making them a nutritious addition to any meal.
Benefits of Growing Microgreens
Growing microgreens offers numerous health benefits. They contain up to 40 times more nutrients than mature vegetables. Rich in vitamins A, C, E, and K, they support immunity and overall health. Plus, they’re easy to grow indoors, even in small spaces like a windowsill.
Getting Started: What You’ll Need
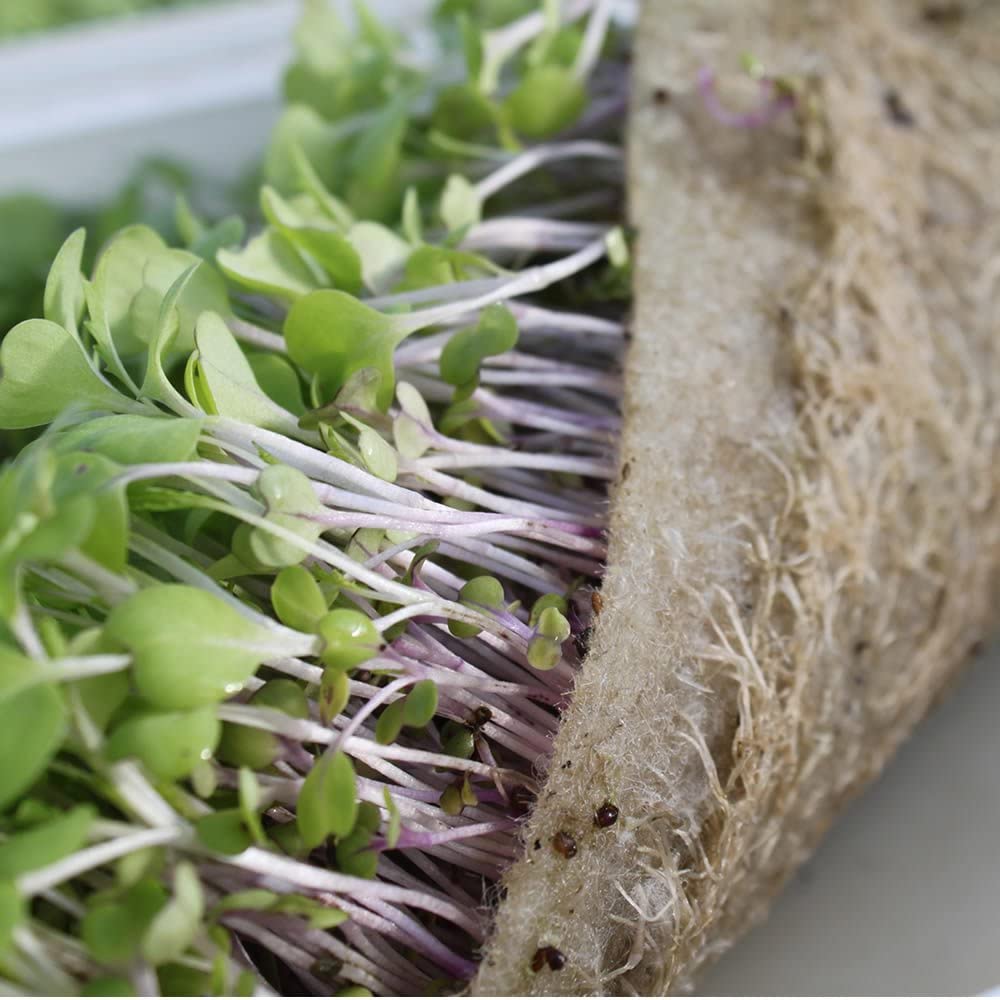
Best Containers for Microgreens
You can use plastic food containers, clear plastic salad boxes, or glass jars for growing microgreens. A standard tray size of 10″ x 20″ works well. Ensure the trays have drainage holes for proper water flow.
Choosing a Growing Medium
Select a growing medium based on your needs. Soil, coconut coir, or hydroponic mats are popular choices. Use potting soil or seedling mix that holds moisture without staying soggy. Avoid fertilizers, as they can cause rot.
Selecting High-Quality Seeds

Choose organic and non-GMO seeds for the best results. Popular options include radish, broccoli, arugula, sunflower, and pea shoots. Soak seeds before planting to boost germination rates.
Step-by-Step Guide to Growing Microgreens
Step 1: Prepare Your Tray and Growing Medium
Use a clean tray with drainage holes. Fill it with a growing medium like seedling mix or organic potting soil. Press the soil down gently to create an even surface.
Step 2: Sow Seeds Evenly Across the Surface
Spread your seeds gently, aiming for even distribution. For a 4×4-inch area, use 1/4 to 1/2 cup of seeds. Keep about 1/4-inch spacing between small seeds.
Step 3: Mist with Water and Cover for Germination
Spray the seeds and soil surface lightly with water using a spray bottle. Cover the tray with a humidity dome or plastic wrap to trap warmth and moisture.
Step 4: Allow 2–4 Days of Darkness (Blackout Period)
Cover the trays with a lid or opaque material to block out light. This blackout period helps seeds grow strong roots and ensures even sprouting.
Step 5: Move to Light and Continue Daily Misting
Place the tray in a bright spot with 6–10 hours of sunlight daily. Use a grow light if natural light isn’t enough. Mist the microgreens each day to keep them moist.
Step 6: Monitor Growth and Manage Mold or Overcrowding

Check your microgreens daily for any signs of mold. Improve air circulation by opening windows or using a small fan. Spread seeds thinly during planting to prevent overcrowding.
Light, Water, and Airflow Essentials
Natural Light vs Grow Lights
Microgreens need 6–10 hours of light each day. A sunny windowsill works well, but winter months may slow growth. Use full-spectrum grow lights with 460 nm blue and 660 nm red wavelengths for optimal growth.
Ideal Watering Schedule
Water microgreens daily using a spray bottle. Keep the soil moist, but avoid making it soggy. Bottom watering works best to stop mold from forming. Check the weight of your tray to know if watering is needed.
Importance of Airflow
Good airflow keeps your microgreens healthy. Poor circulation leads to mold, which can ruin your crop. Open windows 1–2 times daily or use a small fan near the trays to boost air movement.
Harvesting Your Microgreens
How to Know When They’re Ready
Microgreens are ready once they reach 2–4 inches tall. This usually happens about 7–21 days after sowing, depending on the type. Broccoli might grow in just five days during summer but take up to ten days in colder months.
Best Techniques for Harvesting
Use clean scissors to cut microgreens just above the soil line. Avoid disturbing the roots and soil to keep the harvest clean. Harvest in the morning when greens are fresh and dry.
Rinsing, Drying, and Storing Your Greens

Wash your microgreens gently with cold water to remove soil, debris, or any pests. Pat the greens dry using paper towels or a salad spinner. Store dried microgreens loosely in an airtight container in the fridge for up to 7 days.
Common Mistakes and Troubleshooting Tips
Overwatering or Underwatering
Too much water causes rot and mold. Keep the soil moist, not soggy. Bottom watering works better than pouring water on top. It prevents wet surfaces that encourage mold growth.
Poor Germination
Poor germination happens if the seeds are old or expired. Always use high-quality, organic, non-GMO seeds for better results. Soak seeds for 6–8 hours before planting to speed up sprouting.
Mold Growth
Mold can ruin your microgreens. It thrives in overwatered, overcrowded conditions with poor airflow. Use a fan or open windows to improve air circulation. Bottom watering is better than spraying from the top—it keeps the surface dry and less appealing for mold.
Pro Tips for Healthy, Flavorful Microgreens
Soaking Seeds
Soak seeds for 6 to 8 hours before planting. This speeds up sprouting and gives you faster results. Large or hard-coated seeds, like sunflower and pea seeds, need longer soaking, around 8 to 12 hours.
Using Fans to Strengthen Growth
Place a small fan near your microgreens to improve airflow. Good airflow reduces mold, keeps leaves dry, and makes stems stronger. Run the fan 1–2 hours daily during peak growth times.
Rotating Trays for Even Exposure
Turning your trays daily helps microgreens grow evenly. It ensures every side gets the same amount of sunlight or light from a grow lamp. This stops seedlings from becoming leggy, which happens when plants stretch toward a single light source.
Reusing Trays and Mediums: What to Know
Can You Reuse Soil or Mats?
You can’t reuse soil for microgreens. Used soil loses nutrients and may carry pathogens, risking poor growth or mold. Always start with fresh potting mix or organic gardening soil to ensure healthy plants.
Proper Cleaning and Sterilization
Clean trays and containers before use to avoid contamination. Use food-safe trays with drainage holes to prevent excess moisture. Wash them in warm, soapy water first, then rinse well with clean water.
In Summary
Growing microgreens is fun, easy, and rewarding. You can enjoy fresh, healthy greens all year with just a little effort. They fit perfectly in small spaces, even a windowsill. With their rich nutrients and quick growth, they’re a great addition to your healthy diet.
Frequently Asked Questions
How Much Light Do Microgreens Need Daily?
Microgreens need 12-16 hours of light each day. Use a sunny windowsill or an LED grow light to ensure they grow strong and healthy.
Can I Reuse the Growing Medium for Another Batch?
It’s better to use fresh growing medium for each batch. Reusing it can lead to mold or nutrient imbalances, which might harm your microgreens.
What’s the Easiest Microgreen to Grow for Beginners?
Radish microgreens are perfect for beginners. They grow quickly, taste great, and require minimal effort. You’ll see results in just a few days!


More Stories
What Is Yodo Para Tiroides and How Does It Affect Thyroid Health?
How to Claim Your Joy in League of Legends: A Step-by-Step Guide
What is WSET? A Comprehensive Guide to Wine Education