


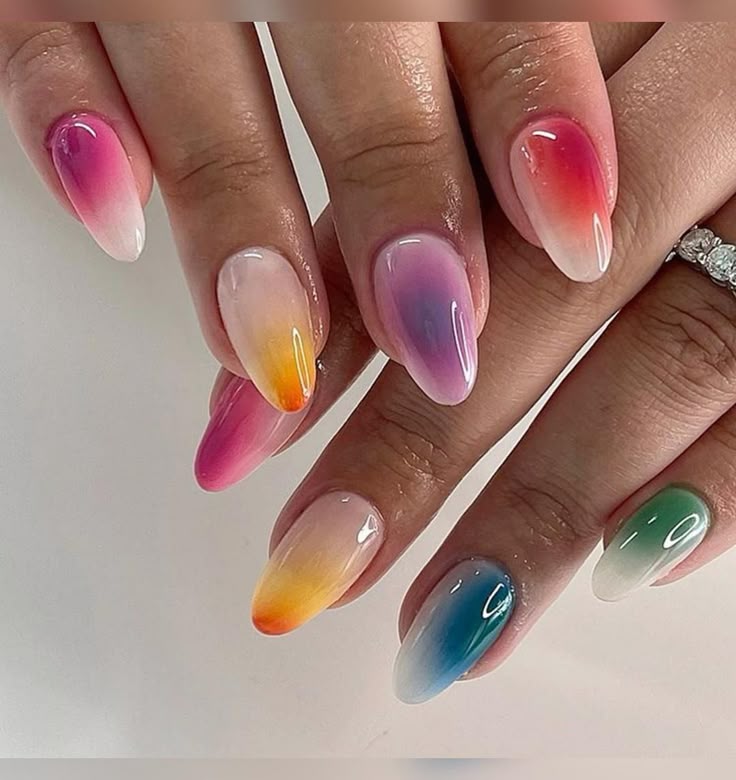
In the ever-evolving world of beauty trends, one style has captured the attention of nail art enthusiasts and celebrities alike—aura nails. With their ethereal, dreamlike appearance, these nails have become a must-try for anyone looking to add a touch of mystique to their look. In this comprehensive guide, we’ll explore what aura nails are, how to create them, and why they’ve become such a popular choice.
Understanding Aura Nails: The Basics of Color Gradients

Aura nails are a type of nail art that features a soft, hazy gradient effect, often resembling an energy field or aura surrounding the fingers. This trend is characterized by a seamless blend of colors, creating a mesmerizing visual that can range from subtle pastels to bold, vibrant hues. The key to achieving this look lies in the gradient technique, which involves layering multiple shades of polish to create a smooth transition between colors.
Step-by-Step Guide to Creating Aura Nails
- Prep Your Nails: Start with clean, shaped nails. Apply a base coat to protect your natural nails and ensure an even application.
- Choose Your Colors: Select a palette of 3-4 complementary shades. Current trends favor soft ombres with transitions from light to dark or bold, contrasting colors for a striking effect.
- Apply the Base Color: Paint your nails with the lightest shade as the base color. Allow it to dry completely.
- Gradient Technique: Using a makeup sponge, apply your chosen colors in horizontal stripes. Dab the sponge onto your nail to create a smooth gradient. Repeat until the desired opacity is achieved.
- Seal the Design: Finish with a top coat to give your aura nails a glossy finish and enhance longevity.
Expert Tips and Common Mistakes

For a flawless finish, avoid overloading your sponge with polish, as this can lead to uneven application. Instead, build up layers gradually. Use a small brush to clean up any excess polish around the cuticles for a polished look. Additionally, ensure your colors blend seamlessly by working quickly before the polish dries.
Product Recommendations
For the best results, opt for high-quality gel polishes that blend well. Brands like Essie and OPI offer excellent color options. A good latex barrier or tape can help avoid messes around the nail edges.
With these tips, you’re ready to embrace the aura nails trend and showcase your creativity! Happy painting!
Celestial Aura: Creating Ethereal Gradient Effects with Pastels
Another popular variation of aura nails is the celestial theme, which uses soft pastels to create a dreamy, otherworldly look. This style is perfect for those who want to add a touch of magic to their manicure.
Step-by-Step Guide
- Preparation: Start with clean, buffed nails. Apply a base coat to protect your natural nails and enhance adhesion.
- Base Color: Choose a light pastel shade (like baby blue or soft lavender) as your base color. Apply two coats for an even finish, allowing each layer to dry completely.
- Gradient Technique: Use a makeup sponge to create the gradient. Apply two or three pastel shades (think mint green, pale pink, and soft yellow) horizontally across the sponge. Dab the sponge onto your nails, starting at the cuticle and working towards the tip. Repeat until you achieve your desired gradient intensity.
- Finishing Touch: Seal your design with a glossy top coat for a smooth finish and added durability.
Expert Tips
For a more celestial touch, add tiny star and moon decals after the gradient dries. Use a clear nail polish to blend the edges of the gradient for a seamless look. Experiment with layering iridescent glitter for that otherworldly shimmer.
Common Mistakes to Avoid
Skipping the base coat can lead to chipping and discoloration. Overloading the sponge with polish can create a muddy gradient; use minimal amounts for better blending.
Product Recommendations
Base Coat: Orly Bonder Base Coat
Orly Bonder Base Coat Pastel Polishes: Essie Gel Couture in ‘Chiffon My Mind’
Essie Gel Couture in ‘Chiffon My Mind’ Top Coat: Seche Vite Dry Fast Top Coat
With these techniques, you’ll be on your way to achieving a stunning Celestial Aura that’s perfect for any occasion. Happy nail painting!
Mystical Vibes: How to Achieve Dark Aura Gradient Styles
For those who prefer a more dramatic look, dark aura gradient styles are a great option. These nails feature deep, rich colors that create a mysterious and enchanting effect.
Step-by-Step Tutorial
- Gather Your Supplies: You’ll need a base coat, two or three dark shades of nail polish (think navy, plum, and charcoal), a makeup sponge, a top coat, and a cleanup brush.
- Apply Base Coat: Start with a protective base coat to prevent staining and enhance longevity.
- Create the Gradient: On a palette, apply lines of each polish color next to each other. Use a makeup sponge to dab the colors onto your nail in a stippling motion, blending them for a seamless transition.
- Layering: For a more intense gradient, repeat the sponging process until you achieve your desired opacity.
- Finish with Top Coat: Seal your design with a glossy top coat for a polished finish.
Expert Tips & Common Mistakes

To ensure a flawless gradient, avoid overloading the sponge; too much polish can lead to streaks. Instead, use light dabs and build up the color gradually. Additionally, always clean your cuticles with a brush dipped in acetone for a neat finish.
Product Recommendations
For the best results, opt for high-quality gel polishes like Gelish or OPI for vibrant pigmentation and smooth application. A fast-drying top coat like Sesh Vite will help maintain your look.
With these techniques and tips, you’ll create mesmerizing nail art that channels your inner mystic. Happy painting!
Blissful Hues: Incorporating Soft Ombre Techniques in Aura Nails
Ombre nails are a timeless trend, and when combined with the ethereal vibe of aura nails, they create a stunning effect that is perfect for any occasion. To achieve this blissful look, follow our expert-guided steps and tips.
Step-by-Step Guide to Aura Ombre Nails
- Prep Your Nails: Begin with clean, filed nails. Apply a base coat to protect your natural nails and enhance adhesion.
- Choose Your Colors: Select 2-3 complementary pastel shades. Soft pinks, lilacs, and baby blues work beautifully for an aura effect.
- Apply Base Color: Paint all nails with a light base color, allowing it to dry completely. This will be the foundation for your ombre.
- Ombre Technique: Using a makeup sponge, apply your chosen colors in stripes. Dab the sponge onto your nail in a gentle rolling motion to blend the colors seamlessly.
- Refine the Design: Repeat the sponging technique until you achieve the desired gradient effect. Don’t forget to feather the edges for a soft transition.
- Seal It: Finish with a top coat to lock in your design and add shine.
Expert Tips and Tricks
Use a latex barrier around your cuticles for easy cleanup. Experiment with sheer top coats to enhance the ombre effect without overwhelming the colors. For added depth, consider incorporating a shimmer polish as one of your ombre colors.
Common Mistakes to Avoid
Skipping the base coat can lead to staining; always apply one! Applying too much polish on the sponge can create a harsh line instead of a blend.
By incorporating these soft ombre techniques, you can elevate your aura nails to new heights. Experiment with different color combinations and let your creativity shine!
Rainbow Radiance: Crafting Vibrant Multi-Gradient Aura Designs
As the world of nail art evolves, the multi-gradient aura design has emerged as a favorite for its vibrant and customizable appeal. This tutorial will guide you through creating your own Rainbow Radiance nails that are bound to turn heads.
Materials You’ll Need:
- Base coat
- White nail polish (for a base)
- A selection of vibrant nail polishes (red, orange, yellow, green, blue, purple)
- Makeup sponge
- Top coat
- Nail art brush or dotting tool
Step-by-Step Guide:
- Prep Your Nails: Start with a clean slate. Apply a base coat to protect your nails.
- Apply a White Base: Use white polish as a canvas to enhance the vibrancy of your gradients.
- Create the Gradient: On a makeup sponge, apply stripes of your chosen colors. Dab the sponge onto your nail, repeating until you achieve a smooth gradient.
- Add Aura Effects: With a nail art brush, blend soft white or light pastels at the tips for an ethereal look.
- Seal the Design: Finish with a top coat to enhance shine and longevity.
Expert Tips & Tricks:

To avoid common mistakes like uneven gradients, practice sponging on a nail wheel first. Always work in thin layers, as this allows for better blending. For a flawless finish, use a clean brush to tidy up the cuticles.
Product Recommendations:
Opt for high-quality gel polishes for maximum vibrancy and durability. Brands like OPI and Essie offer excellent color payoff.
With these tips, your Rainbow Radiance nails will be a stunning representation of your nail art skills. Embrace the trends and let your creativity shine!
Chakra Colors: Spiritual Meaning Behind Each Aura Gradient
Nail art enthusiasts are embracing the vibrant world of chakra colors, where each hue symbolizes specific energies and emotions. This tutorial explores the trending aura gradient technique, allowing you to channel your spiritual side with stunning nail designs.
Step-by-Step Guide to Creating Chakra Gradient Nails
- Gather Your Supplies: You’ll need a base coat, a selection of nail polishes in chakra colors (red, orange, yellow, green, blue, indigo, violet), a makeup sponge, and a top coat.
- Prepare Your Nails: Start with clean, shaped nails. Apply a base coat to protect your natural nails and provide a smooth canvas.
- Apply Base Colors: Paint each nail with a base color that aligns with the respective chakra. For example, use red for the root chakra, orange for the sacral chakra, and so on.
- Gradient Technique: Using a makeup sponge, dab the chosen colors in horizontal stripes. Lightly press the sponge onto your nail to blend the colors seamlessly. Repeat until you achieve your desired intensity.
- Finishing Touches: Seal your art with a high-quality top coat to enhance the shine and longevity of your design.
Expert Tips and Common Mistakes
To avoid common pitfalls, ensure each layer is dry before applying the next. This prevents smudging and enhances the gradient effect. Use a clean sponge for each color to maintain vibrancy. If you’re new to gradients, practice on a nail wheel before applying onto your nails.
Product Recommendations
For best results, opt for high-pigment polishes like OPI or Essie. A quick-dry top coat, such as Sally Hansen Insta-Dri, will help in achieving a flawless finish.
Embrace the spiritual essence of chakra colors while creating beautiful nails that resonate with your energy. Happy painting!
Seasonal Aura: Adapting Gradient Styles for Different Times of Year
Gradient nail art is a versatile technique that allows you to express seasonal vibes through color transitions. Here’s how to adapt gradient styles for each season, ensuring your nails stay on-trend.
Spring: Floral Dreams
For spring, opt for pastel colors like lavender, mint green, and soft pink. Use a sponge for the gradient technique: apply base colors to the sponge, then dab onto your nails for a soft blend. Finish with a matte top coat to enhance the delicate look. Tip: Ensure your base coat is fully dry before applying the gradient to prevent smudging.
Summer: Vibrant Hues
In summer, embrace bold colors like coral, turquoise, and sunny yellow. Mix these shades on a makeup sponge and blend them onto your nails, ensuring a smooth transition. Top with a glossy top coat to amplify the vibrancy. Common Mistake: Avoid applying too much polish to the sponge; this can lead to streaks instead of a seamless gradient.
Fall: Warm Tones
For fall, choose rich, earthy tones such as burnt orange, deep red, and gold. Layer these colors, starting with the darkest at the cuticle and blending lighter shades towards the tip. A matte finish can add sophistication to this cozy palette. Best Practice: Use a clean sponge for each color to keep hues pure and prevent muddiness.
Winter: Cool Elegance
In winter, icy blues, silver, and white create a frosty effect. Apply a base coat, then use the sponge technique to layer colors. Finish with a top coat that has a subtle shimmer to evoke the sparkle of fresh snow. Product Recommendation: Use quick-dry top coats for a fast finish, especially in colder months.
By adapting your gradient techniques to the seasons, you can keep your nail art fresh and stylish all year round. Happy painting!
Nail Art Tools: Essential Supplies for Perfecting Aura Nails
Aura nails have taken the beauty world by storm, blending soft gradient transitions with vibrant color palettes. To achieve this ethereal look, you’ll need the right tools and techniques. Here’s a guide to help you perfect your aura nails.
Essential Tools
- Makeup Sponge: A key tool for blending colors seamlessly. Choose a high-density sponge for optimal results.
- Nail Art Brushes: A fine detail brush is crucial for creating intricate designs and the soft halo effect.
- Dotting Tool: Perfect for adding delicate accents or tiny dots to enhance your aura design.
- Top Coat: A high-gloss top coat not only seals your design but also adds a professional finish.
Step-by-Step Guidance
Start by applying a base coat to protect your nails. Paint your nails with a light, neutral base color. Using a makeup sponge, dab on your chosen colors starting from the tips and blending towards the cuticle to create a gradient effect. Use a fine detail brush to add a halo effect around the cuticle area using a contrasting shade. Finish with a glossy top coat to lock in the design and enhance shine.
Expert Tips
To avoid common mistakes, ensure your sponge is damp, not wet, to prevent streaking. Practice your blending technique on a scrap nail wheel before applying on your nails. Consider using gel polish for long-lasting wear and vibrant color payoff.
For the best results, invest in quality products such as OPI GelColor or Essie Gel Couture. These brands offer superior pigmentation and durability, perfect for intricate designs like aura nails.
With the right tools and techniques, you can master the aura nails trend and elevate your nail art game to professional levels!
Aura Nails for Beginners: Step-by-Step Tutorial for Dreamy Looks
Aura nails have taken the nail art world by storm, offering a whimsical and ethereal aesthetic perfect for any occasion. This step-by-step tutorial will guide you through creating your own dreamy aura nails, ensuring you stay on-trend with this captivating look.
Materials You’ll Need
- Base coat
- White nail polish
- Soft pastel shades (pink, blue, lavender)
- Makeup sponge
- Top coat
- Nail art brush (optional)
Step-by-Step Guide
- Prep Your Nails: Start with clean, shaped nails. Apply a base coat to protect your natural nails.
- Base Color: Paint your nails with a white polish as your base color. This will enhance the vibrancy of the pastels.
- Sponge Technique: Using a makeup sponge, apply your chosen pastel shades in a gradient fashion. Start with the lightest color at the base and blend upward for a soft aura effect.
- Add Dimension: For added depth, use a nail art brush to create subtle swirls or waves with a contrasting pastel color.
- Seal the Deal: Once dry, finish with a high-gloss top coat to lock in your design and add shine.
Expert Tips and Common Mistakes
To achieve a flawless finish, avoid overloading the sponge with polish, as it can lead to blotchy results. Instead, build the color gradually. Additionally, always allow each layer to dry before adding the next to prevent smudging.
Recommended Products
Opt for high-quality polishes like OPI or Essie for vibrant colors, and consider using a gel top coat for long-lasting wear.
With this guide, you’re well on your way to mastering the enchanting aura nails trend. Happy painting!
Conclusion
Aura nails have become a staple in the world of nail art, offering a unique blend of creativity, color, and expression. Whether you’re drawn to the soft pastels of a celestial aura, the bold contrasts of a dark gradient, or the vibrant hues of a rainbow radiance, there’s an aura nail style for everyone. By following the tips and techniques outlined in this guide, you can easily create stunning nail art that reflects your personal style and personality. So why wait? Dive into the world of aura nails and let your creativity shine!
Meta Title: What Are Aura Nails? A Complete Guide to This Trendy Nail Art Style
Meta Description: Discover everything you need to know about aura nails, from their origins to step-by-step tutorials and expert tips. Stay updated with the latest nail art trends today!
Author: [Nama Lengkap]
Title/Role: Beauty and Fashion Writer
Credentials: [Ringkasan kualifikasi atau pengalaman terkait]
Profile Link: [Link profil, opsional]
Sources:
– US Trending News
– Beauty Trends Today
– Nail Art Magazine
Internal Links:
– How to Choose the Right Nail Polish
– Top 10 Nail Art Trends 2024
– DIY Nail Art Ideas
Call to Action: Stay updated with the latest news and trends by subscribing to our newsletter today!


More Stories
US Trending News: The History and Legacy of Zoo York in Streetwear Culture
US Trending News: Exploring Zach Top Greensboro
US Trending News: Youngboy Concert in Birmingham: What to Know Before You Go