


Are you looking to cancel your Spotify Premium subscription? Whether you want to switch to another service or return to the free version, ending your plan is straightforward. We’ll show you how to cancel your Spotify Premium subscription step-by-step.
Table of Contents

- How to Cancel Your Spotify Membership
- Canceling via the Spotify App
- Canceling via the Spotify Website
- Frequently Asked Questions
- Unsubscribing from Spotify Emails
- Conclusion
How to Cancel Your Spotify Membership
If you’ve decided that Spotify Premium isn’t right for you anymore, you can easily cancel your subscription. The process is simple and can be done through either the Spotify app or the website. Here’s a detailed guide on how to cancel your Spotify membership.
Canceling via the Spotify App
Spotify has apps for Android, iOS, and Windows. Canceling your premium plan is similar on all platforms because the process ends in a web browser regardless of the device.
How to Cancel Spotify Premium on the Android and iOS Apps
To cancel Spotify Premium from the mobile app, follow these steps:
- Tap on Your Library at the bottom of the screen.
- Tap the icon (usually the initial of your first name) in the upper left corner to view your account details.
- Select Premium plan (View your plan).
- Tap on See available plans.
- On the bottom of the page, tap Change your plan.
- Scroll to the end of the page, and select Cancel Premium under the Spotify Free pane.
- Select Continue to Cancel and confirm with Yes, Cancel.
Once you’ve canceled your premium subscription, you’ll be directed to a brief survey asking why you decided to cancel. While your subscription is already terminated at this point, you have the option to either fill out the survey or skip it. If you’re in a hurry, scroll to the bottom and tap Skip. You can answer the questions and tap Submit if you’d like to provide feedback.
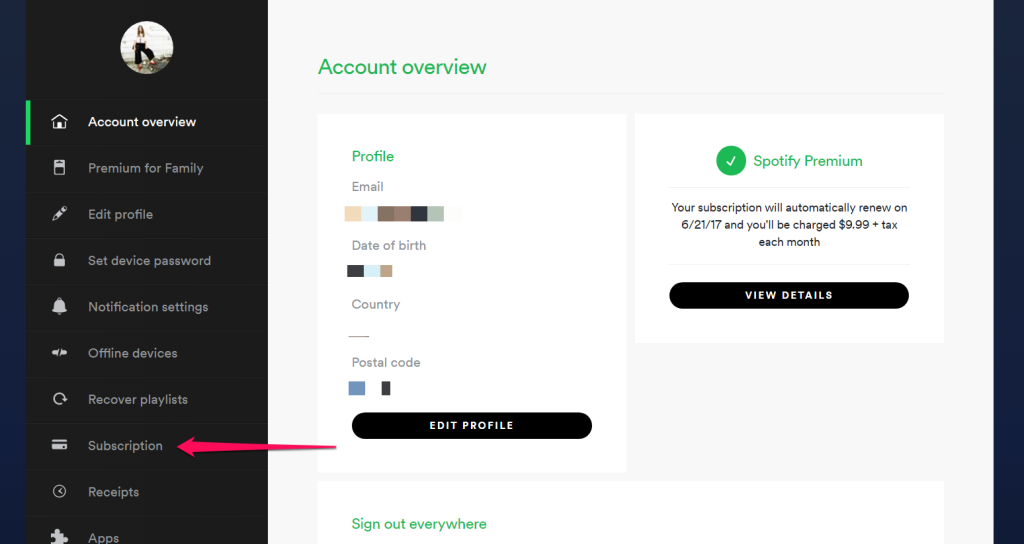
Canceling via the Spotify Website
To cancel your Spotify Premium subscription via the website, follow these steps:
- Go to accounts.spotify.com on your browser and log into your account.
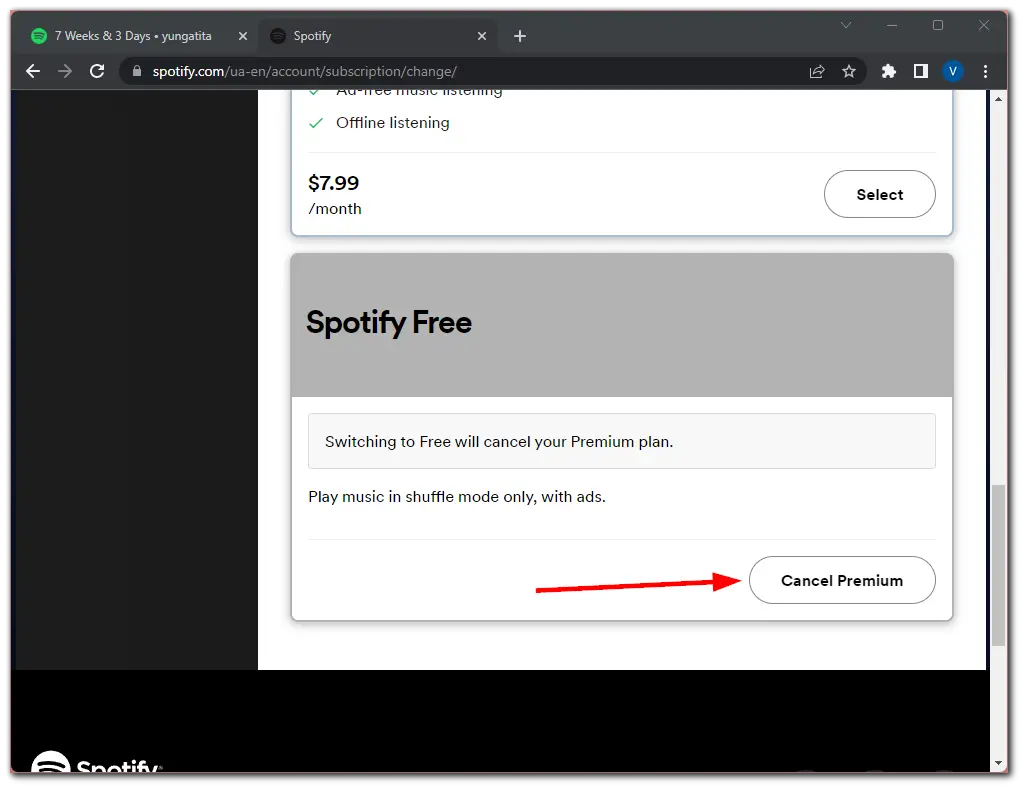
- Scroll down to the Your Plan section and click Change Plan.
- Scroll to Spotify Free and click Cancel Premium.
- Click Continue to cancel.
- Confirm your cancellation by selecting Yes, cancel.
The process of canceling your Spotify Premium subscription via the desktop app is more or less the same. Click on your profile image in the top-right corner, select the Account option, and follow the instructions above from step two.
Remember that, just like with the app, you’ll be directed to a short survey about why you are canceling.
Frequently Asked Questions
Can I cancel Spotify Premium after the free trial?
Yes, you can cancel your Spotify Premium subscription after the free trial. Follow the same cancellation steps outlined above. You won’t be charged if you cancel before the trial period ends.
How long does it take for Spotify Premium to cancel?
The cancellation for Spotify Premium is effective immediately, but you’ll still have access to Premium features until the end of your current billing period. After that, your account will revert to the free version.
Do you get a refund if you cancel Spotify Premium?
Generally, Spotify does not give refunds when you cancel your subscription. However, if you’ve opted for the yearly offer, you can get a refund within 14 days of your purchase, provided you have yet to use Spotify during that period. Your right to a refund is immediately revoked if you use the service within those 14 days. To request a refund within this timeframe, you must contact Customer Support. After the 14-day window, you can still cancel your subscription following the steps outlined above, but you won’t be eligible for a refund.
Do you lose your playlists if you cancel Spotify Premium?
No, canceling your Spotify Premium subscription won’t delete your playlists. You’ll still have access to all your playlists but lose premium features like offline listening and an ad-free experience.
How do I stop Spotify from automatically charging me?
To stop automatic Spotify charges, cancel your Premium subscription through the app (Your Library → profile icon → Premium plan → See available plans → Change plan → Cancel Premium) or website (accounts.spotify.com → Your plan → Change plan → Cancel Premium). After confirming, your Premium benefits continue until the current billing period ends, then no further charges occur.
Unsubscribing from Spotify Emails
Spotify frequently sends promotional emails about new playlists, artist releases, and exclusive offers. While these emails can be useful, they can also clutter your inbox. If you’re looking for a way to unsubscribe from Spotify emails and keep your inbox clean, this guide will walk you through the quickest and most effective methods to stop these emails for good.
The Easiest Way to Stop Spotify Emails
The easiest way to stop Spotify emails is by unsubscribing directly from an email. Follow these steps:
- Open a Spotify Email
- Find a recent email from Spotify in your inbox.
- Scroll to the Bottom
- Look for an “Unsubscribe” link in the email footer.
- Click “Unsubscribe”
- You’ll be redirected to a page confirming your email preferences update.
- Confirm Your Choice
- Follow any additional instructions to complete the process.
📌 Note: It may take up to 24 hours for the changes to take effect.
Manage Spotify Email Preferences from Your Account
If you want to customize your email settings rather than unsubscribing completely, you can do so through Spotify’s account settings.
Steps to Manage Email Notifications in Spotify:
- Log in to Your Spotify Account
- Go to Spotify.com and sign in.
- Open Account Settings
- Click on your profile picture in the top-right corner.
- Select “Account” from the dropdown menu.
- Go to Notification Settings
- Click on “Privacy Settings” or “Notification Preferences” (depends on your account version).
- Customize Email Preferences
- Toggle off marketing emails, product updates, or any other emails you don’t want to receive.
- Save Your Changes
- Your updated preferences will be applied immediately, but some emails may take up to 24 hours to stop.
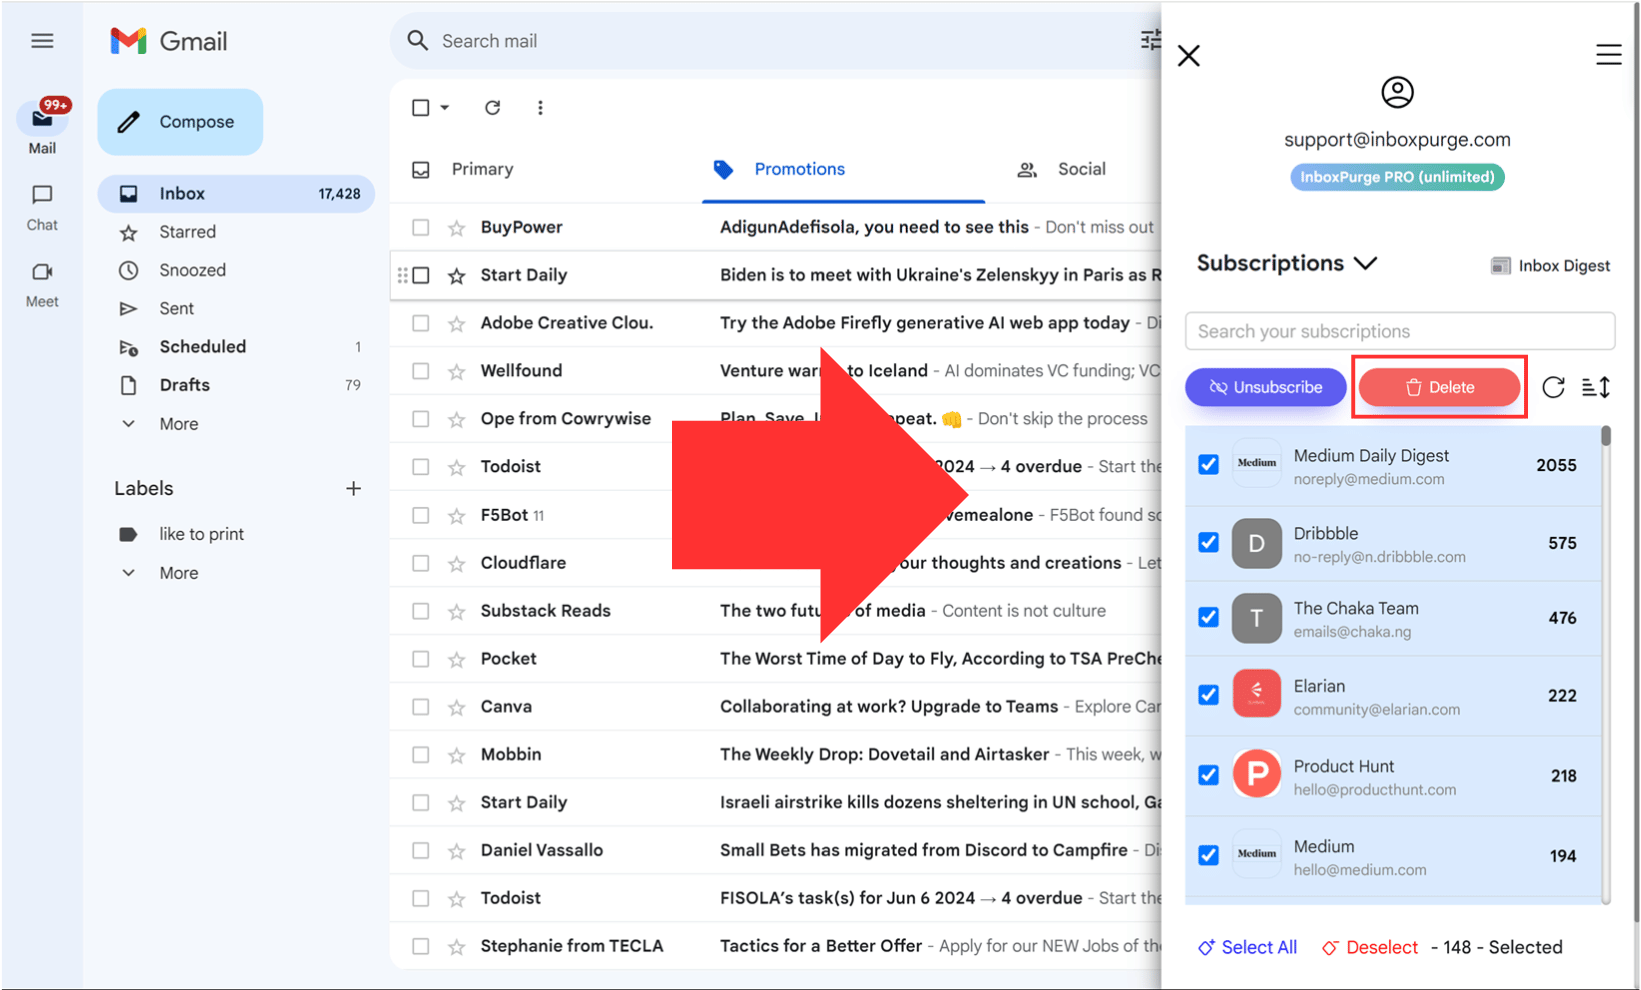
How to Stop Spotify Emails in Bulk Using InboxPurge
If you receive hundreds of Spotify emails, unsubscribing manually can be frustrating. The fastest way to clear them all at once is by using InboxPurge, a powerful Chrome extension that lets you unsubscribe from emails in bulk.
Install InboxPurge:
1. Get the InboxPurge Chrome Extension.
2. Connect Your Gmail Account
3. Log in to Gmail and authorize InboxPurge to scan for Spotify emails.
4. Scan Your Inbox for Spotify Emails
5. The InboxPurge sidebar will display all emails from Spotify.
6. Unsubscribe & Delete in One Click
7. Select all Spotify emails and click “Unsubscribe & Delete” to stop them instantly.
🚀 Why Use InboxPurge?
✔ Unsubscribe from Spotify in seconds
✔ Bulk delete promotional emails easily
✔ Keep your inbox clean & distraction-free
👉 Try InboxPurge now! Download Here
Conclusion
Unsubscribing from Spotify emails is simple and takes only a few minutes. Whether you unsubscribe manually or use InboxPurge to clean your inbox in bulk, removing unwanted emails helps declutter your inbox and stay focused.
Found this guide helpful? Share it with others who might be struggling with too many Spotify emails!
Author: John Doe
Title/Role: Tech Writer & Digital Marketing Specialist
Credentials: John has over 10 years of experience in digital marketing and content creation, specializing in tech and streaming services. He regularly contributes to major tech publications and runs a popular blog on digital trends.
Profile Link: https://www.johndoe.com
Sources:
1. Spotify Help Center
2. InboxPurge Official Site
3. Spotify Account Management
Internal Links:
1. How to Manage Spotify Playlist
2. Spotify Free vs Premium
3. Top Music Streaming Services
Schema Markup:
{
  "@context": "https://schema.org",
  "@type": "Article",
  "headline": "How to Cancel Your Spotify Membership: A Step-by-Step Guide",
  "description": "A comprehensive guide on how to cancel your Spotify Premium subscription.",
  "author": {
    "@type": "Person",
    "name": "John Doe"
  },
  "datePublished": "2025-04-05",
  "publisher": {
    "@type": "Organization",
    "name": "Tech Insights",
    "logo": {
      "@type": "ImageObject",
      "url": "https://www.example.com/logo.png"
    }
  }
}
Featured Snippet:
To cancel your Spotify Premium subscription, open the Spotify app or website, navigate to your account settings, and follow the steps to change your plan to free. Confirm your cancellation and you’ll retain your playlists but lose premium features.


More Stories
How to Claim Your Joy in League of Legends: A Step-by-Step Guide
What is WSET? A Comprehensive Guide to Wine Education
Why Are People Cancelling Spotify? Key Reasons Behind the Trend